> For the complete documentation index, see [llms.txt](https://bharathvaj-p.gitbook.io/oci-pull-push/llms.txt). Markdown versions of documentation pages are available by appending `.md` to page URLs; this page is available as [Markdown](https://bharathvaj-p.gitbook.io/oci-pull-push/container-oci-registry.md).
# Container/OCI Registry
## Introduction
A Container Registry acts as a storage place for container images whereas an OCI Registry acts as a storage place for container images, Helm charts, as well as other OCI-compliant artifacts.
You can pull Helm charts from either a public registry or a private registry (only if the registry contains Helm charts) and display them on the Chart Store page in Devtron.
{% hint style="warning" %}
#### Who Can Perform This Action?
Only a Super-Admin can create, update, or delete a container/OCI registry.
{% endhint %}
***
## Add an OCI Registry
### Steps
To add a container/OCI registry, follow the steps below:
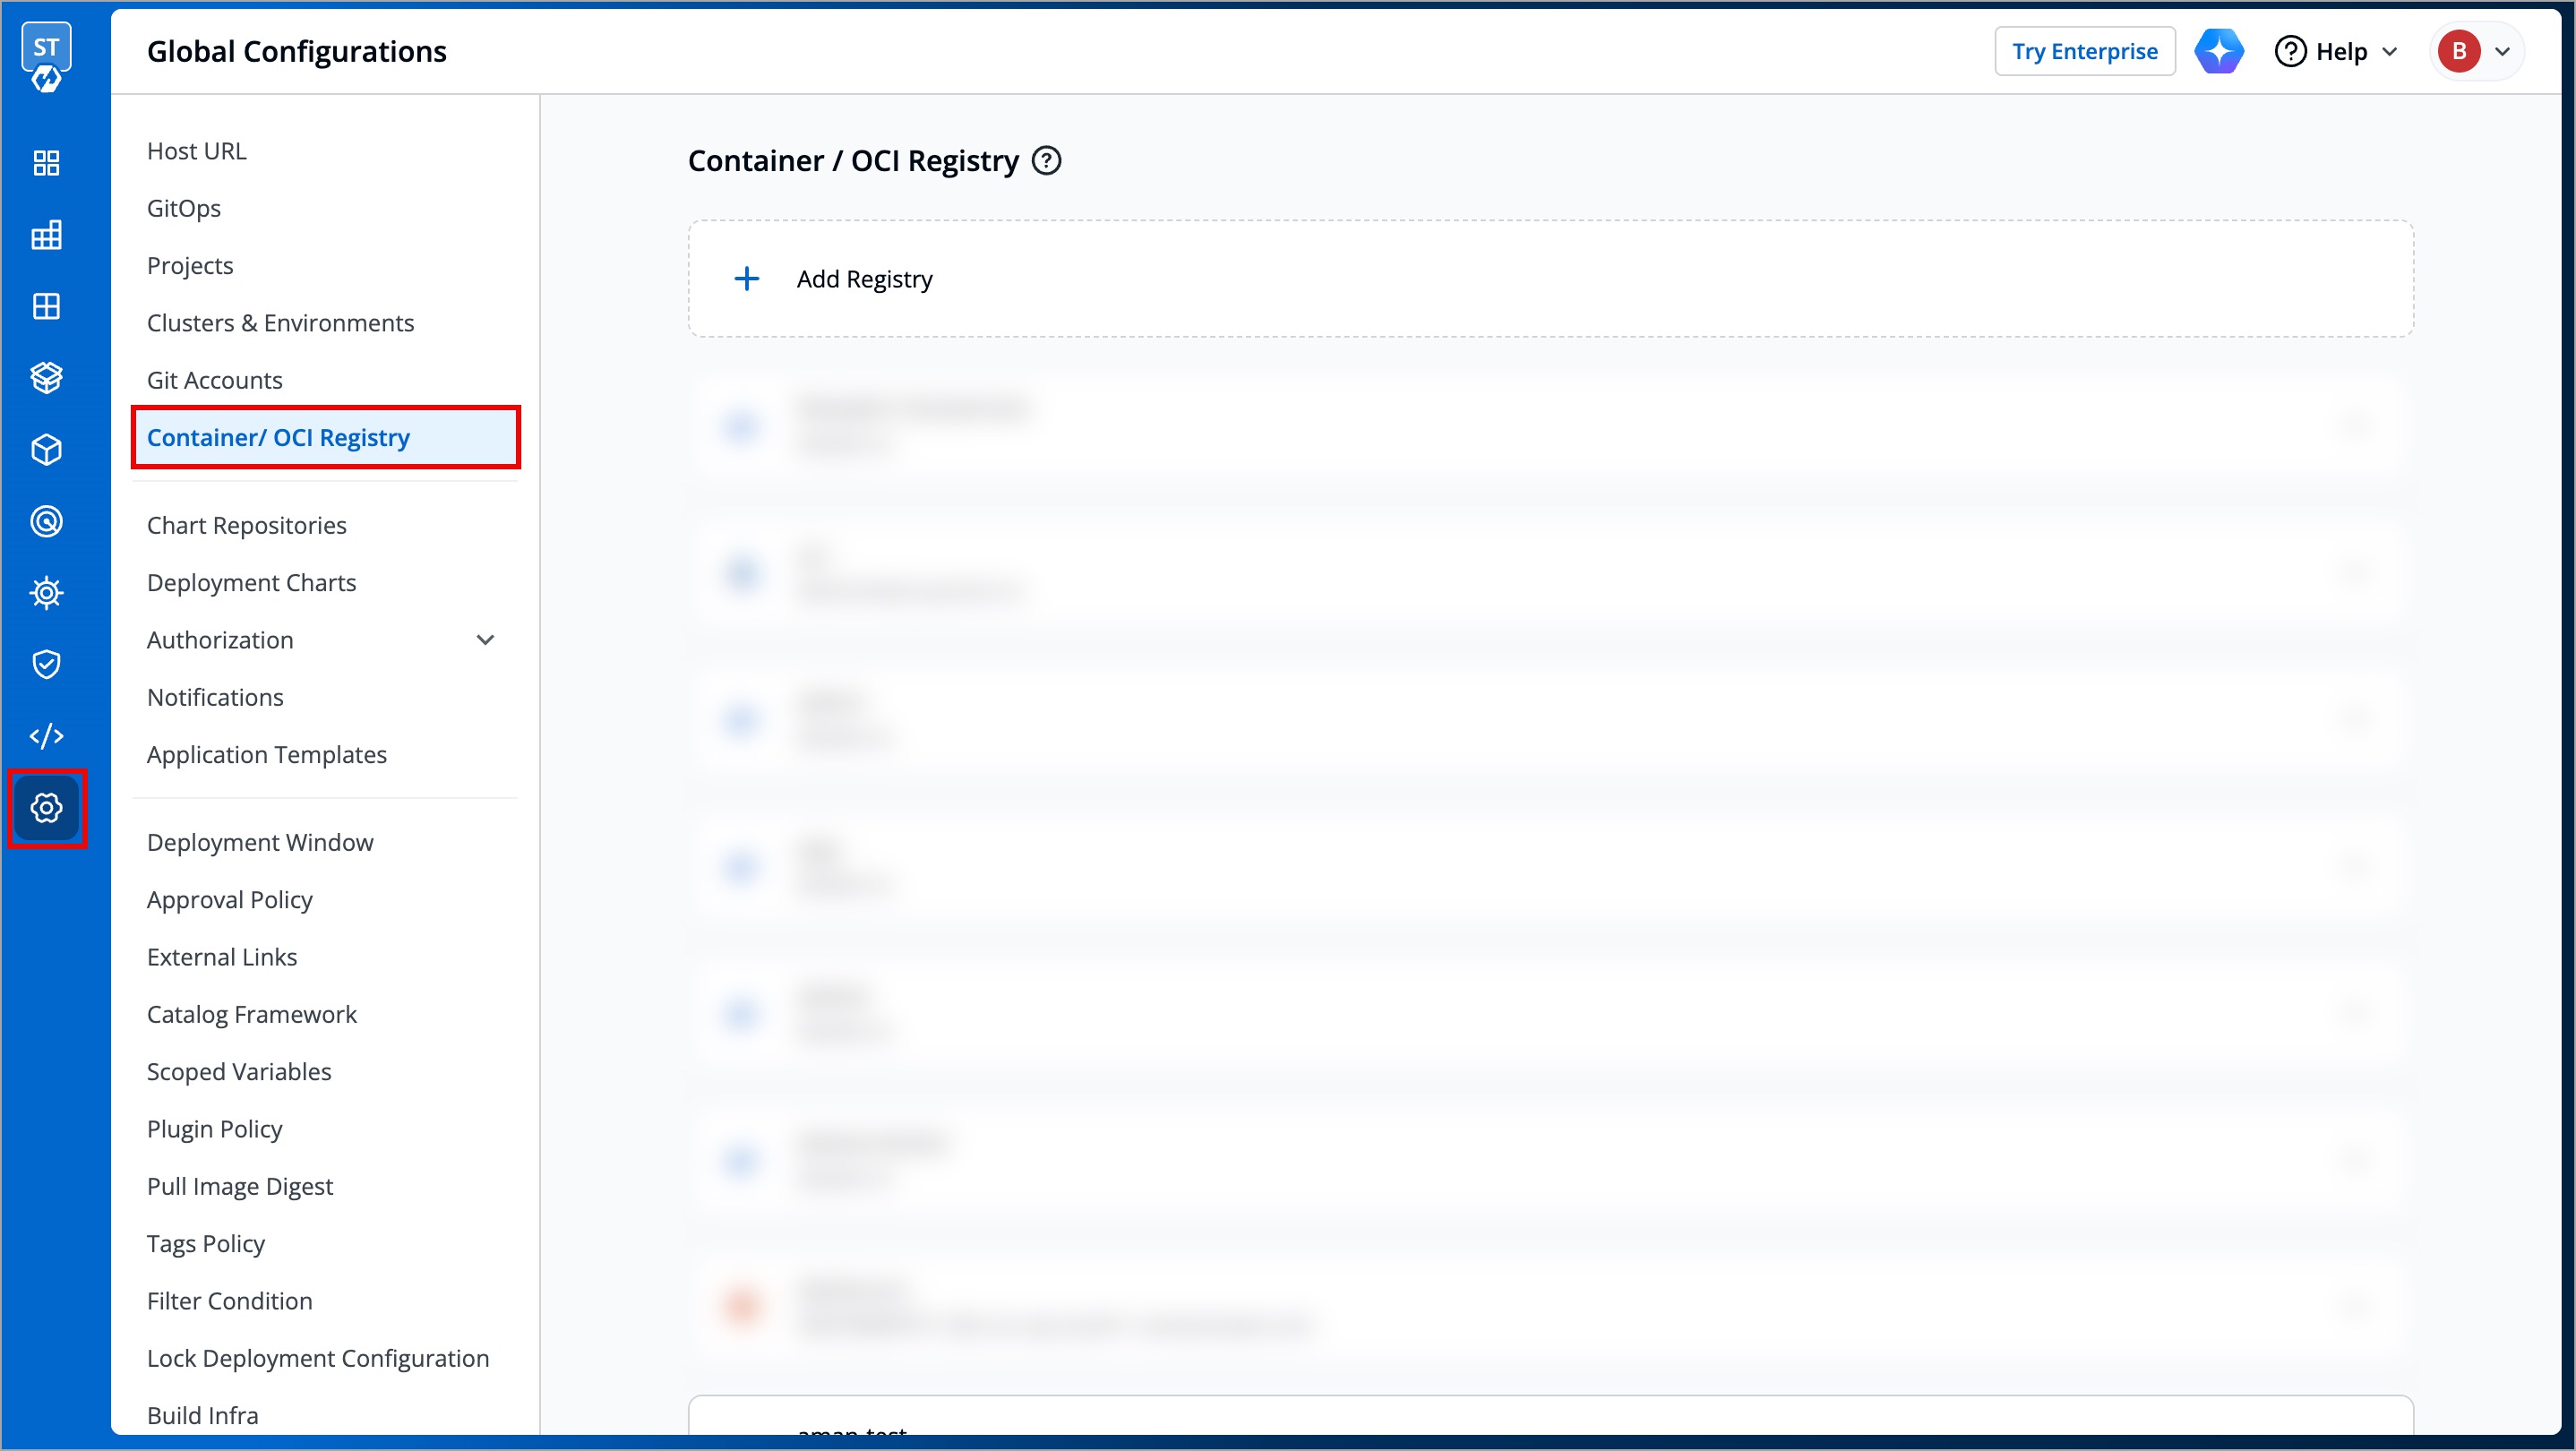
1. Navigate to **Global Configurations** → **Container/OCI Registry**.

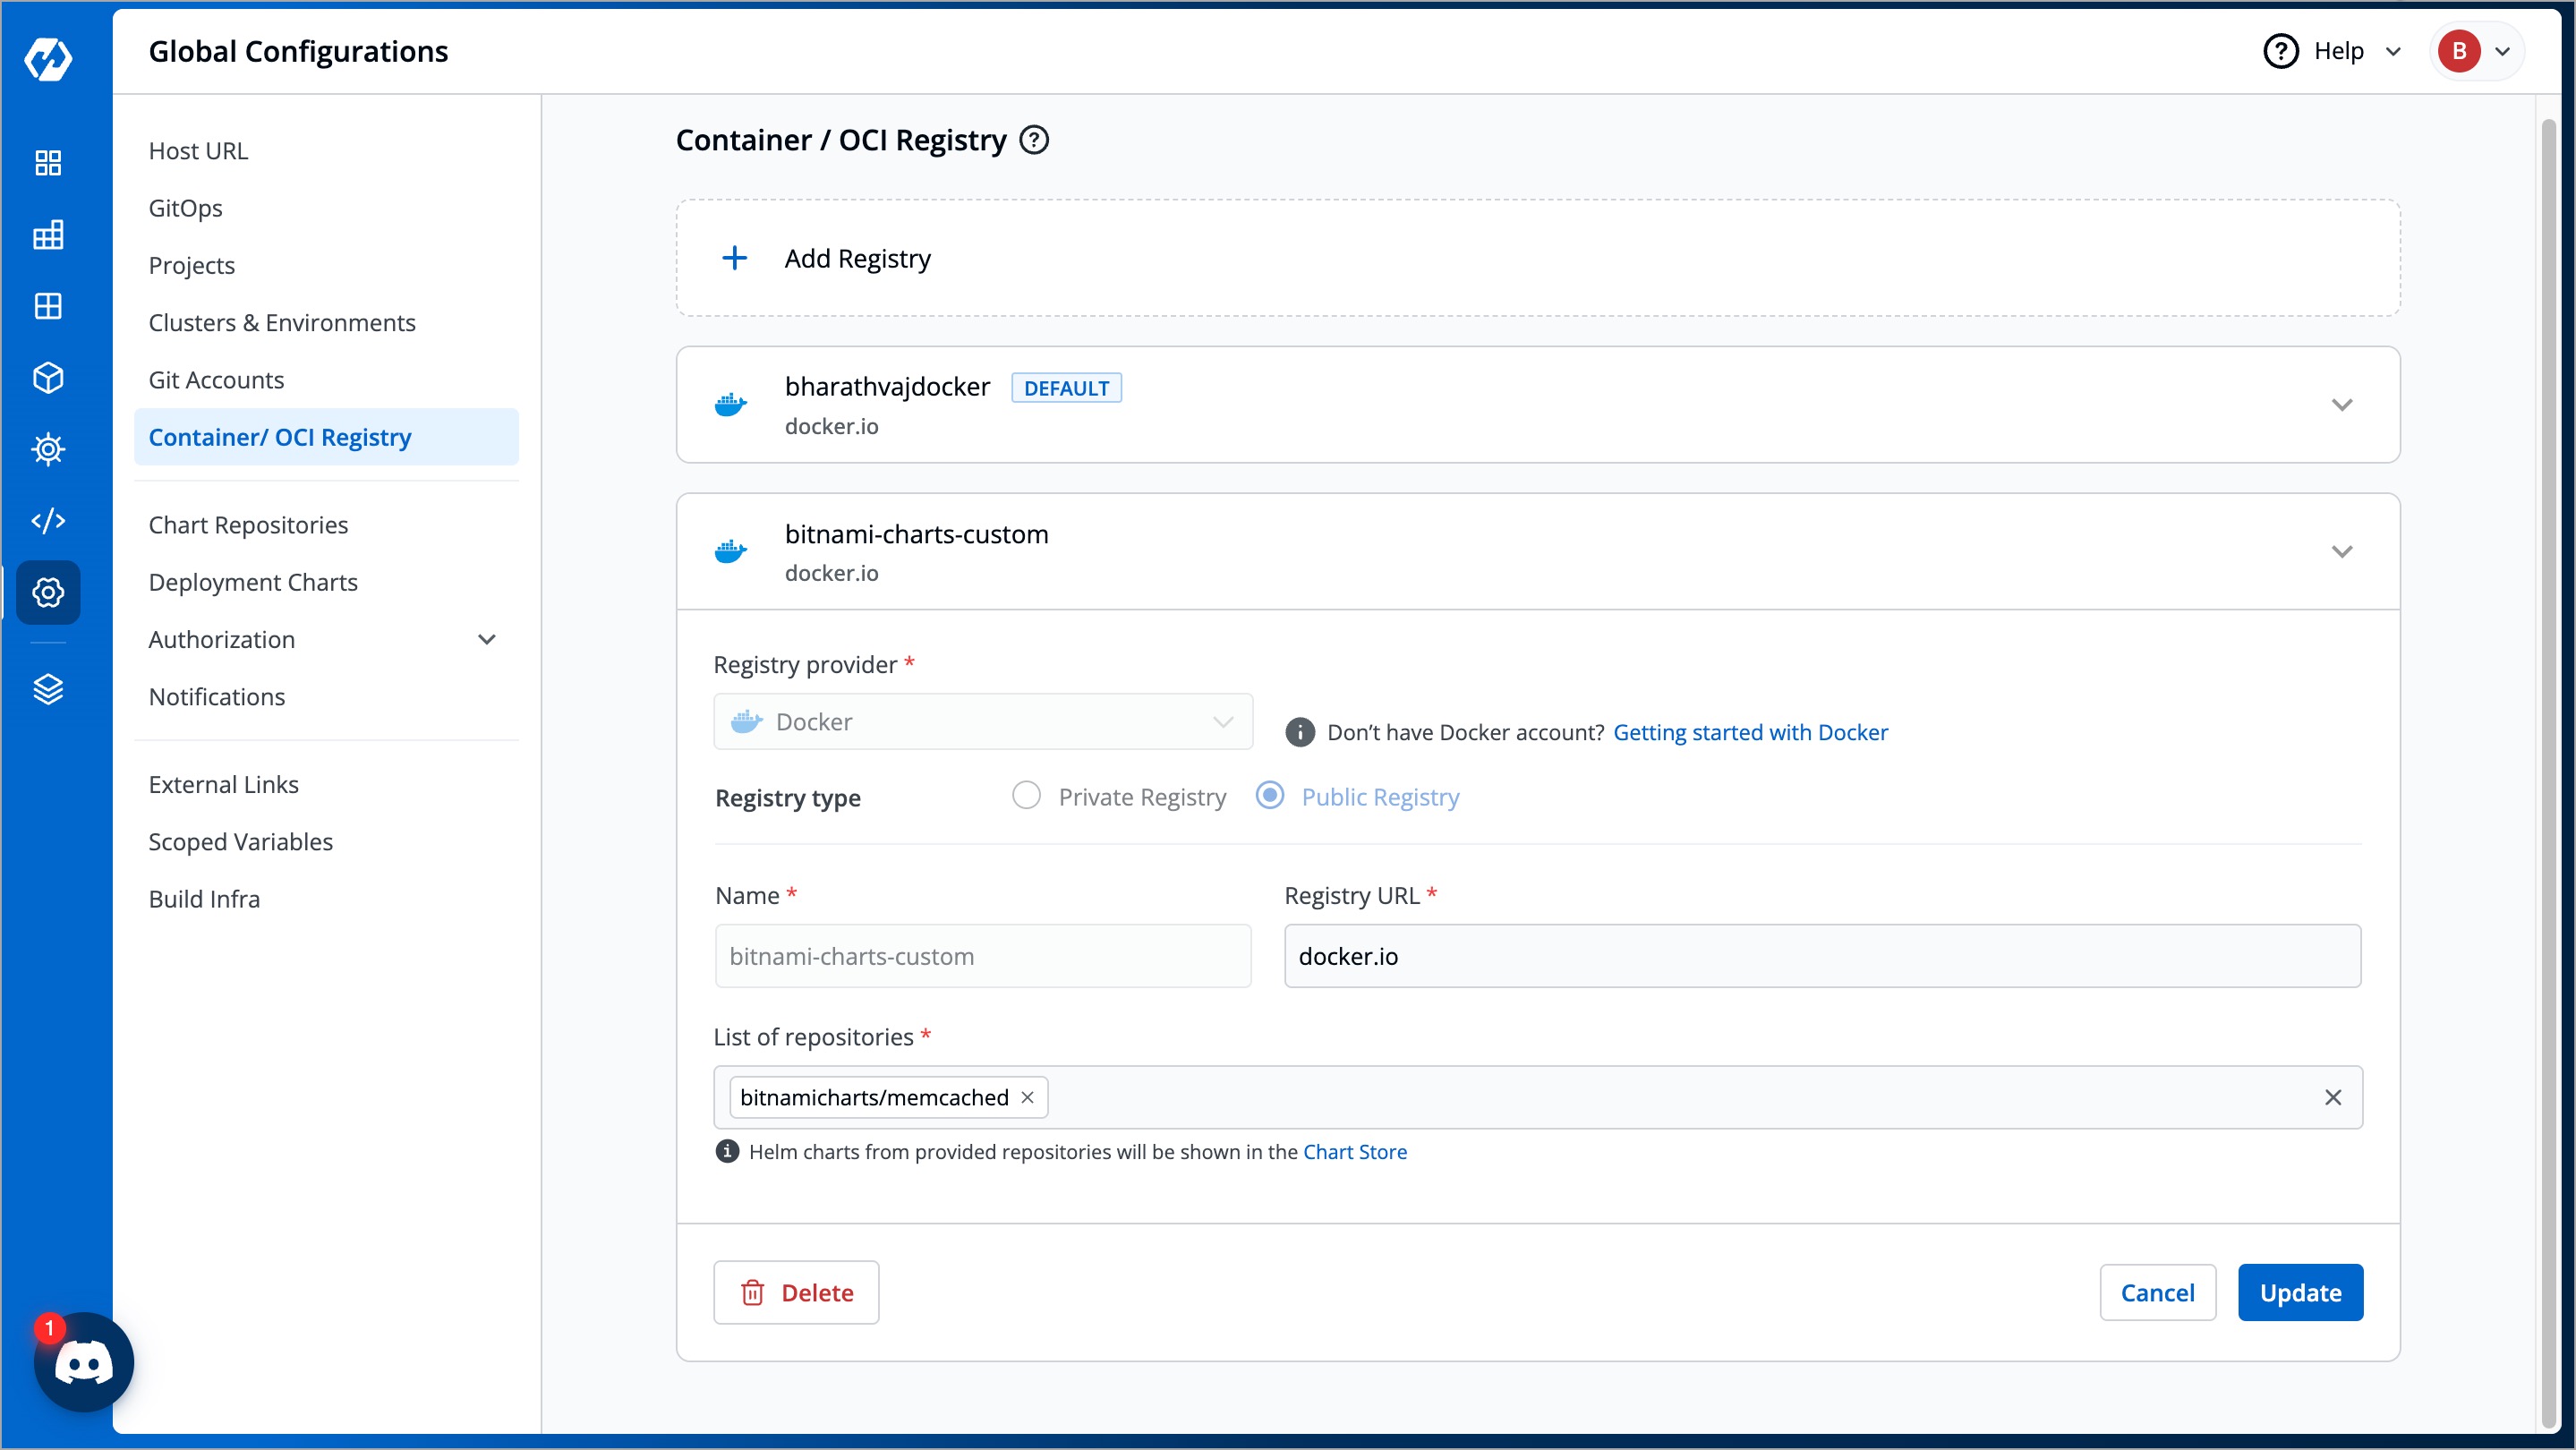
2. Click **Add Registry**.

3. Choose your preferred registry provider from the **Registry provider** drop-down box. Refer to [Supported Registry Providers](#supported-registry-providers) for more information.
4. Choose the Registry type:
* **Private Registry**: Select this if your images or artifacts are hosted, or should be hosted, on a private registry restricted to the authenticated users. Selecting this option requires you to enter your registry credentials (username and password/token).
* **Public Registry**: Unlike private registry, this option does not require credentials. You only need to provide the registry URL and repository name(s).
5. Refer to the following table and enter the required details:
| Fields | Description |
| --------------------------- | -------------------------------------------------------------------------------------------------------------------------------------------------------------------------------------------------------------------------------------------------------------------------------------------------------------------------------------------------------------------------------------------------------------------------- |
| **Name** | Enter your registry name. You can [find the username](https://devtron-public-asset.s3.us-east-2.amazonaws.com/images/use-cases/oci-pull/find-username.jpg) from your registry provider account. This name will also appear in the **Container Registry** drop-down box available within the Build Configuration section of your application |
| **Registry URL** | Enter your registry URL (**Note**: do not include `oci://`, `http://`, or `/https://` in the URL) |
| **Authentication Type** | Select your preferred authentication type. The credential input fields may differ depending on the registry provider, check [Registry Providers](#supported-registry-providers) |
| **Connection Method** | \* Direct: Select this option to directly connect to an API server that is on the same network or publicly accessible.
\* via Proxy: Select this option to connect to a remote server that is behind a proxy and not directly reachable.
\* via SSH Tunnel: Select this option to connect to a server that is not publically accessible, using a secure SSH connection
|
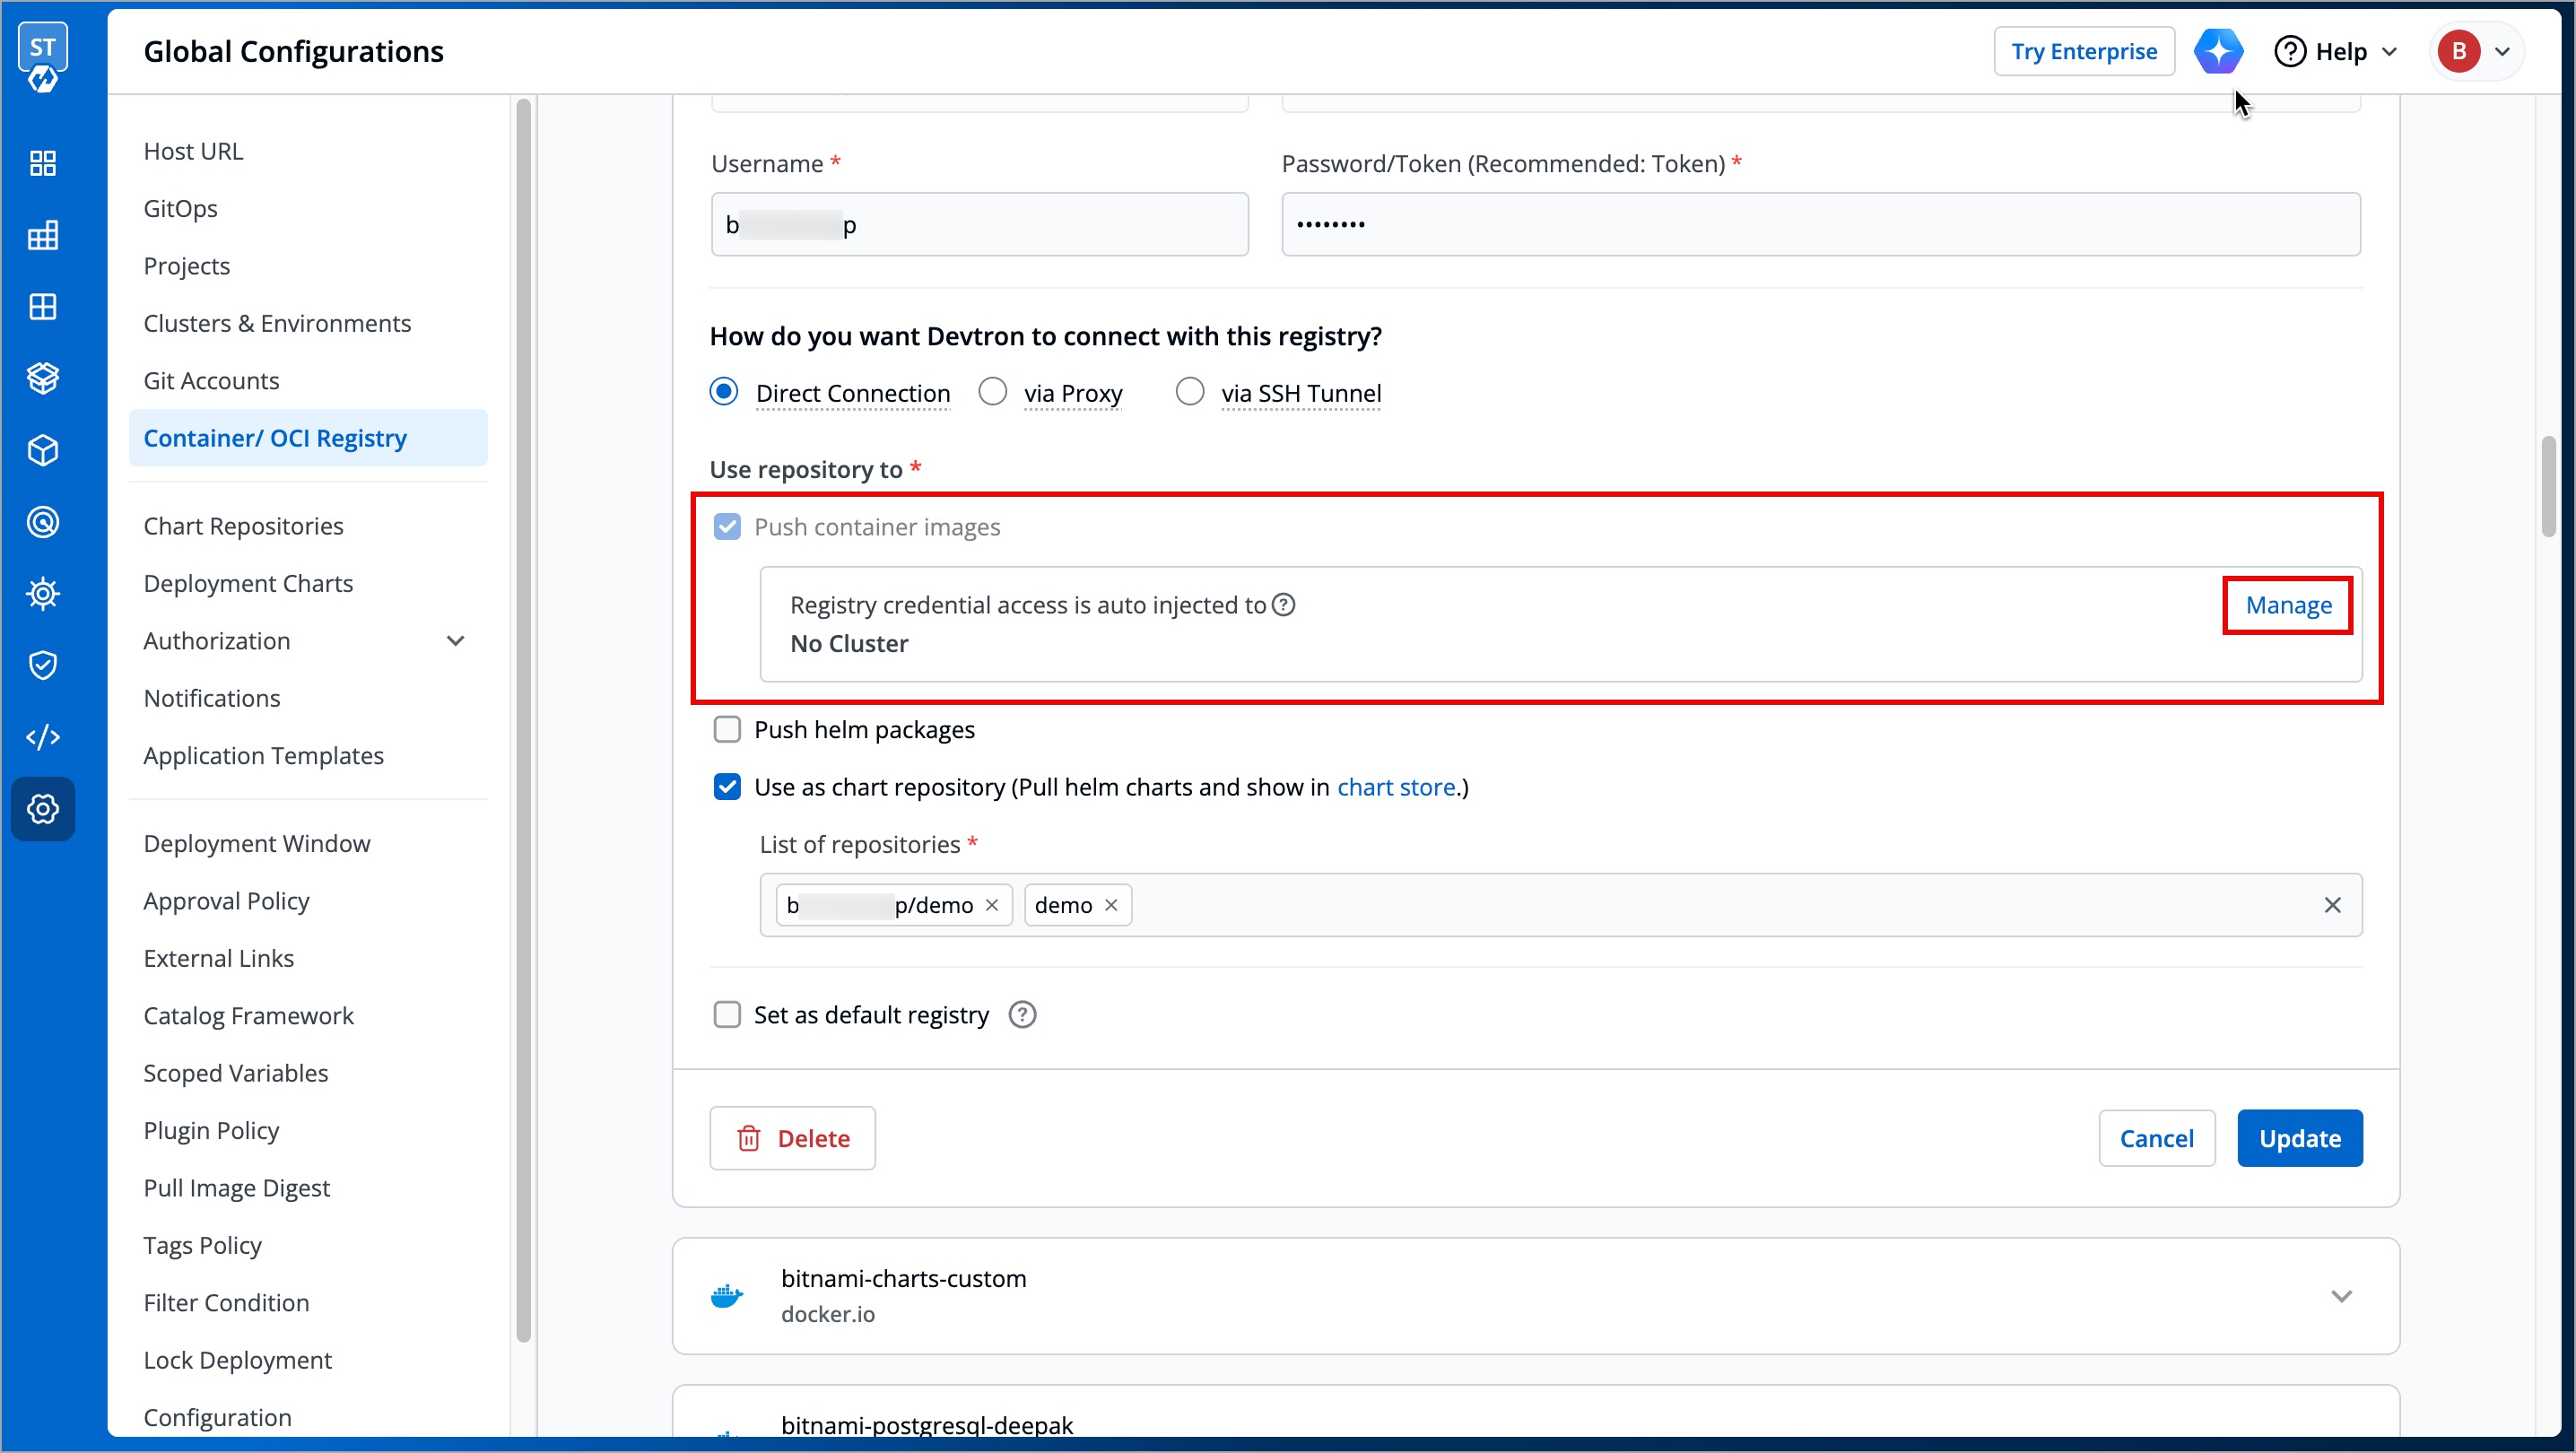
| **Push container images** | Enable this checkbox if you'd like to use the repository to push container images. This checkbox is enabled by default, and you may disable it if you don't intend to push container images after a CI build. If you wish to to use the same repository to pull container images as well, read [Registry Credential Access](#registry-credential-access) |
| **Push helm packages** | Enable this checkbox if you wish to [push Helm charts to your OCI registry](#push-helm-packages) |
| **Use as chart repository** | Enable this checkbox if you want Devtron to [pull Helm charts from your registry and display them on Chart Store](#use-as-chart-repository). Also, you will have to provide a list of repositories (present within your registry) for Devtron to successfully pull the Helm charts |
| **Set as default registry** | Enable this checkbox to set your registry as the default registry hub for your images or artifacts |
6. Click **Save**.
### Push Helm Packages
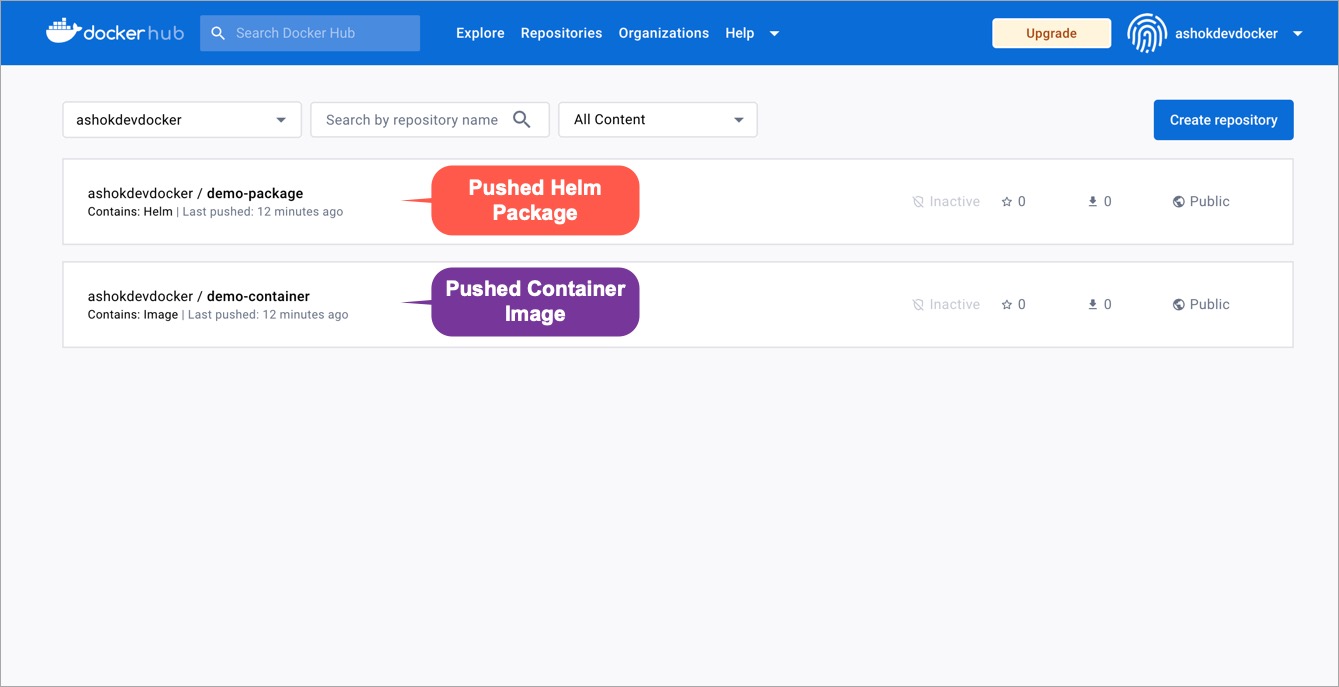
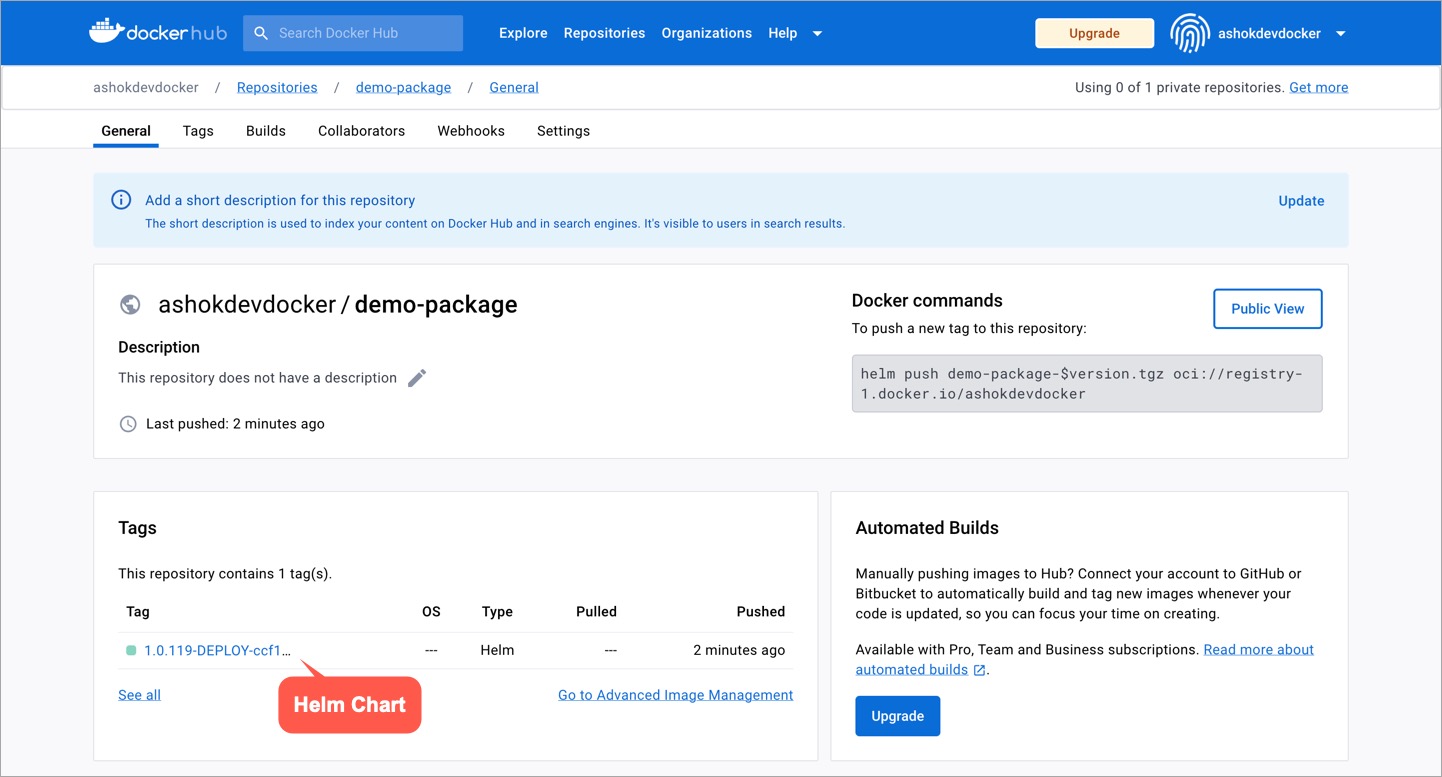
Upon enabling this option, Devtron supports the pushing of Helm charts to your OCI registry.
This is possible through isolated clusters that facilitate airgapped deployments. In other words, it generates a Helm package that you can use to deploy your application in air-gapped clusters.
If you have configured your CD pipeline to push the Helm package to your OCI registry, you can view the pushed Helm package in your registry as shown below:
### Use as Chart Repository
{% hint style="info" %}
#### Prerequisite
An OCI registry containing Helm charts is added to the Container/OCI Registry page.
{% endhint %}
When you have your own Helm charts in a private registry and prefer to use them, enable the **Use as chart repository** checkbox. The OCI registry is then considered as a chart repository, and all the existing charts are fetched and displayed in the Chart Store.
#### Tutorial
{% embed url="" %}
#### Steps
To use an OCI registry as a chart repository, follow the steps below:
1. Navigate to **Global Configurations** → **Container/OCI Registry**.
2. Search for your preferred OCI registry in the list and select it.
3. Add your chart repositories (where the helm charts are present) in the **List of repositories** field.
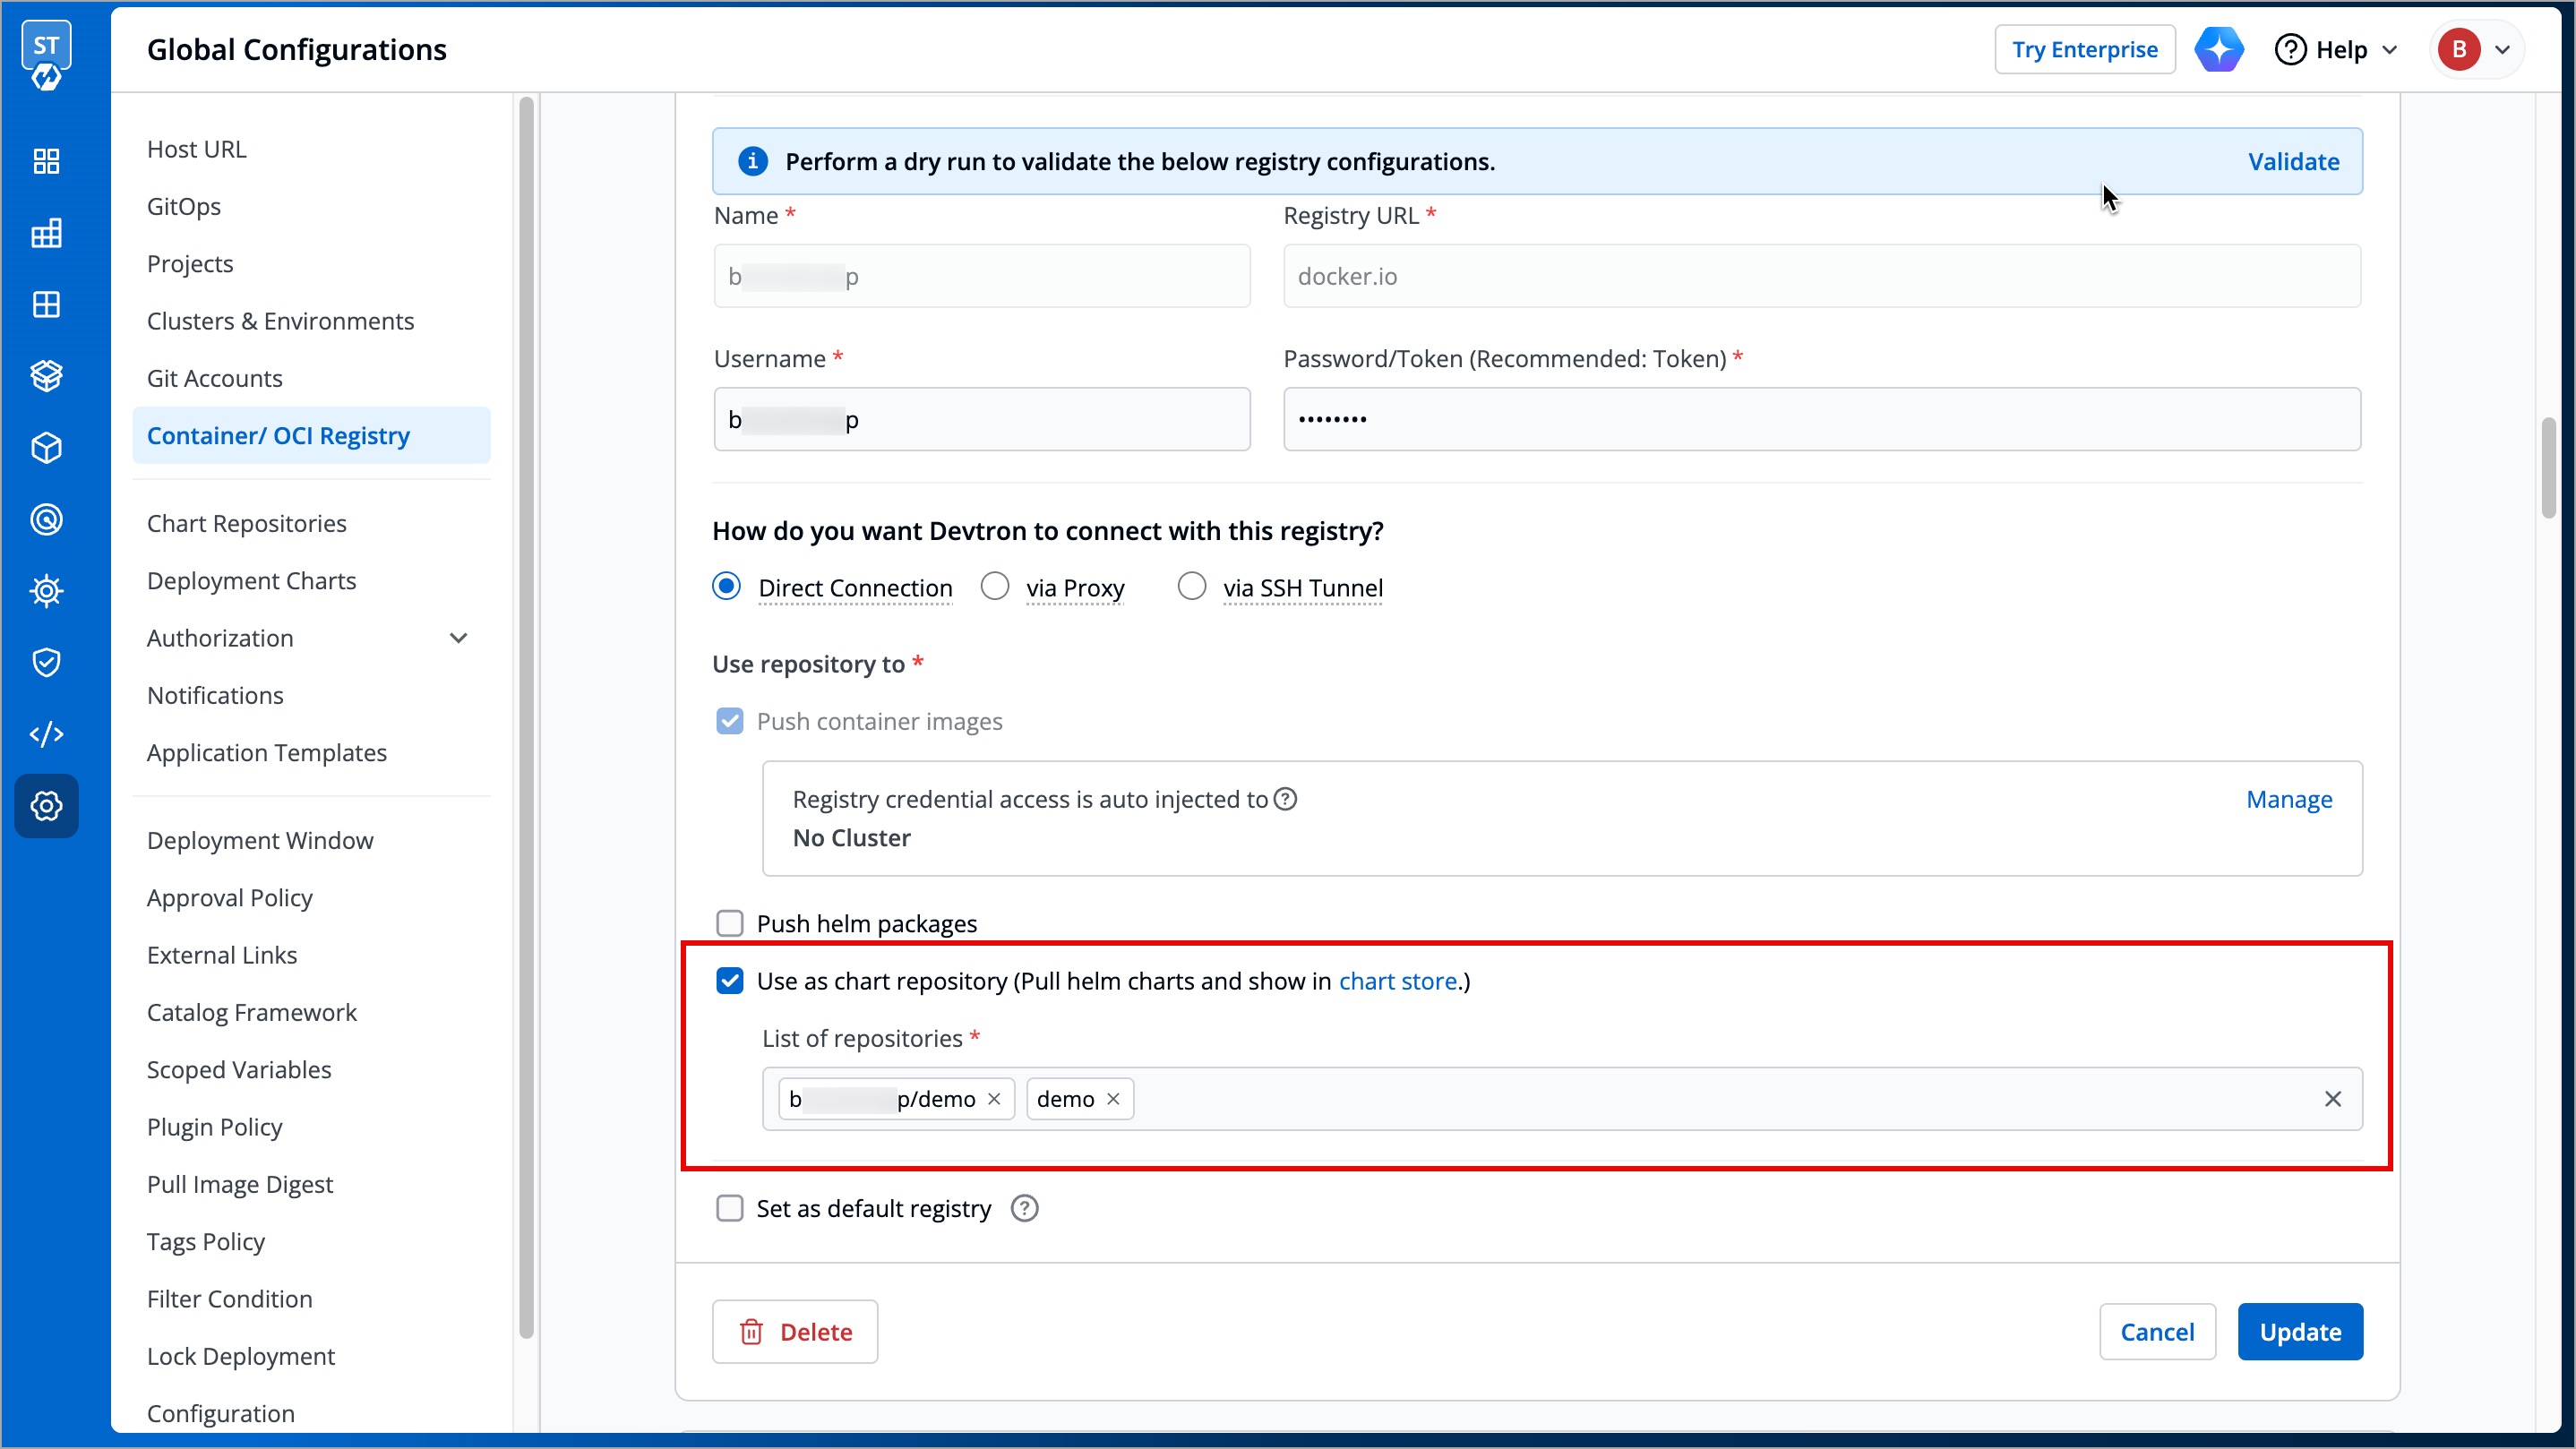
4. Click **Save**.
***
## Registry Credential Access
You can pull images from a container/OCI registry, but when using private registries, it is important to control which clusters have acccess to pull the images. That is why managing registry credential access becomes crucial.
You can choose to either auto-inject registry credentials to clusters or use a Secret to pull an image for deployment to environments on specific clusters. When you choose to auto-inject registry credentials, the right authentication details (e.g., `username`/`password or token`) are automatically provided to a pod without the need of manual intervention.
You can create a pod that uses a Secret to pull an image from a private container registry of your choice (e.g., [Docker Hub](https://www.docker.com/products/docker-hub)).
To manage the registry credential access, follow the steps below:
1. Navigate back to the **Container/OCI Registry** page.
2. Select your preferred registry.
3. Click the **Manage** button displayed next to the **Registry credential access is auto injected to** label.
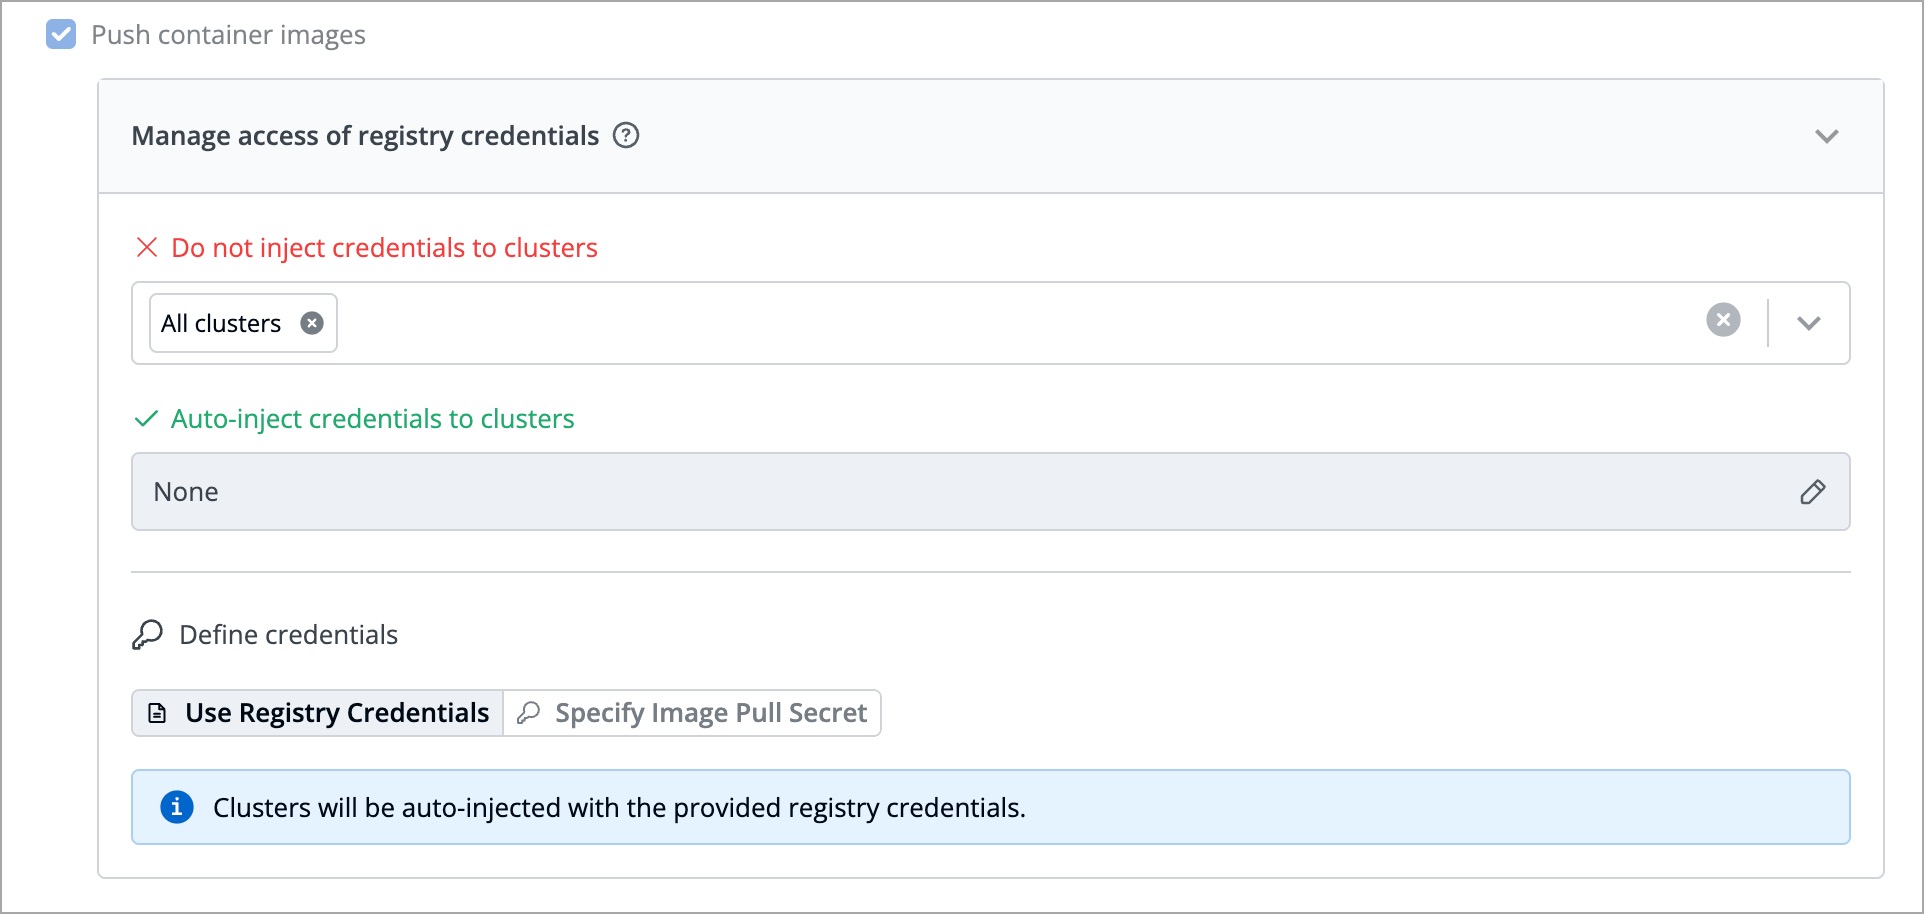
You can manage registry credential access in the following two ways:
| Fields | Description |
| ----------------------------------------- | --------------------------------------------------------------- |
| **Do not inject credentials to clusters** | Select the clusters where you do not want to inject credentials |
| **Auto-inject credentials to clusters** | Select the clusters where you want to inject credentials |
4. You can choose one of the two options for defining credentials:
* [Use Registry Credentials](#use-registry-credentials)
* [Specify Image Pull Secret](#specify-image-pull-secret)
5. Click **Save**.
### Use Registry Credentials
If you select **Use Registry Credentials**, the clusters will be auto-injected with the registry credentials of your registry type. As an example, if you select **Docker** as the registry type, then the clusters will be auto-injected with the `username` and `password/token` associated with your Docker Hub account.

### Specify Image Pull Secret
You can create a Secret by providing credentials on the Command Line/Terminal.

1. Navigate back to the **Container/OCI Registry** page.
2. Enter the secret name (e.g., `regcred`) in the **Specify Image Pull Secret** section.
3. Refer to the table below and enter the following command in the Command Line/Terminal to create a Secret:
{% hint style="info" %}
#### Important Note
Docker is used just as an example here. However, you can create Secrets with any registry provider of your choice.
{% endhint %}
```bash
kubectl create -n secret docker-registry regcred --docker-server= --docker-username= --docker-password= --docker-email=
```
| Key | Description |
| ---------------------- | -------------------------------------------------------------------------------------------- |
| `namespace` | Specify your sub-cluster (e.g., **devtron-demo**) |
| `your-registry-server` | Specify your private Docker registry FQDN. For Docker Hub, use |
| `your-name` | Specify your Docker registry username (e.g., `johndoe`) |
| `your-pword` | Specify your Docker password |
| `your-email` | Specify your Docker email id |
You have successfully set your Docker credentials in the cluster as a Secret called `regcred`.
{% hint style="warning" %}
When you enter Secrets in the Command Line/Terminal while `kubectl` is running, the Secrets can get stored in your shell history unprotected, and can also be temporarily visible to other users.
{% endhint %}
## Delete an OCI Registry
If you prefer to delete an OCI registry, follow the instructions below:
1. Navigate back to **Container/OCI Registry** page.
2. Select your preferred OCI registry.
3. Click the **Delete** button. The OCI registry will be deleted.
{% hint style="warning" %}
#### Important Note
If you used an OCI registry as a chart source, deleting the OCI registry will remove all its associated charts from the Chart Store.
{% endhint %}
***
## Supported Registry Providers
### ECR
Amazon ECR is an AWS-managed container image registry service. The ECR provides resource-based permissions to the private repositories using AWS Identity and Access Management (IAM). ECR allows both Key-based and Role-based authentications.
Before you begin, create an [IAM user](https://docs.aws.amazon.com/AmazonECR/latest/userguide/get-set-up-for-amazon-ecr.html) and attach the ECR policy according to the authentication type.
Provide the following additional information apart from the common fields:
| Fields | Description |
| ----------------------- | ---------------------------------------------------------------------------------------------------------------------------------------------------------------------------------------------------------------------------------------------------------------------------------------------------------------------------------------------------------------------------------------------------------------------------------------------------------------------------------------------------------------------------------------------------------------------------------------------------------------------------------------------------------------------------- |
| **Registry URL** | Example of URL format: `xxxxxxxxxxxx.dkr.ecr..amazonaws.com` where `xxxxxxxxxxxx` is your 12-digit AWS account ID |
| **Authentication Type** | Select one of the authentication types:
|
### Docker
Provide the following additional information apart from the common fields:
| Fields | Description |
| ------------------ | -------------------------------------------------------------------------------------------------------------------------------------------------------------------------------- |
| **Username** | Provide the username of the Docker Hub account you used for creating your registry. |
| **Password/Token** | Provide the password/[Token](https://docs.docker.com/docker-hub/access-tokens/) corresponding to your docker hub account. It is recommended to use `Token` for security purpose. |
### Azure
For Azure, the service principal authentication method can be used to authenticate with username and password. Visit this [link](https://docs.microsoft.com/en-us/azure/container-registry/container-registry-auth-service-principal) to get the username and password for this registry.
Provide the following additional information apart from the common fields:
| Fields | Description |
| ----------------------------- | ----------------------------------------------------- |
| **Registry URL/Login Server** | Example of URL format: `xxx.azurecr.io` |
| **Username/Registry Name** | Provide the username of your Azure container registry |
| **Password** | Provide the password of your Azure container registry |
### Artifact Registry (GCP)
JSON key file authentication method can be used to authenticate with username and service account JSON file. Visit this [link](https://cloud.google.com/artifact-registry/docs/docker/authentication#json-key) to get the username and service account JSON file for this registry.
{% hint style="warning" %}
Remove all the white spaces from JSON key and wrap it in a single quote before pasting it in `Service Account JSON File` field
{% endhint %}
Provide the following additional information apart from the common fields:
| Fields | Description |
| ----------------------------- | -------------------------------------------------- |
| **Registry URL** | Example of URL format: `region-docker.pkg.dev` |
| **Service Account JSON File** | Paste the content of the service account JSON file |
### Google Container Registry (GCR)
JSON key file authentication method can be used to authenticate with username and service account JSON file. Please follow [link](https://cloud.google.com/container-registry/docs/advanced-authentication#json-key) to get the username and service account JSON file for this registry.
{% hint style="warning" %}
Remove all the white spaces from JSON key and wrap it in single quote before pasting it in `Service Account JSON File` field
{% endhint %}
### Quay
Provide the following additional information apart from the common fields:
| Fields | Description |
| ------------ | ----------------------------------------- |
| **Username** | Provide the username of your Quay account |
| **Token** | Provide the password of your Quay account |
### Other
Provide below information if you select the registry type as `Other`.
| Fields | Description |
| -------------------------------------------- | ------------------------------------------------------------------------------------------------------------------------------------------------------------------------------------------------------------------------------------------------------------------------------------------------------------------------------------------------------------------------------------------------------------------------------------------------------------------------------------------ |
| **Registry URL** | Enter the URL of your private registry |
| **Username** | Provide the username of your account where you have created your registry |
| **Password/Token** | Provide the password or token corresponding to the username of your registry |
| **Advanced Registry URL Connection Options** | - Allow Only Secure Connection: Tick this option for the registry to allow only secure connections
- Allow Secure Connection With CA Certificate: Tick this option for the registry to allow secure connection by providing a private CA certificate (ca.crt)
- Allow Insecure Connection: Tick this option to make an insecure communication with the registry (for e.g., when SSL certificate is expired)
|
{% hint style="info" %}
You can use any registry which can be authenticated using `docker login -u -p `. However these registries might provide a more secured way for authentication, which we will support later.
{% endhint %}